💡 OAuth2
[출처] OAuth 2.0 동작 방식의 이해|작성자 MDS인텔리전스
JWT는 사용자의 Credential을 직접 백엔드 어플리케이션에서 관리하는 구조이지만
OAuth2의 인증 방식은 백엔드 어플리케이션의 직접적인 관여가 없고,
ThirdParty에서 사용자의 인증처리를 위임하고 Resource에 대한 자격증명 토큰을 발급한다
OAuth2를 적용하기 적합한 Application 유형
- ThirdParty Application의 직접적인 API 사용하는 경우
- 다중 인증 목적 (보안성 ↑)의 경우
- User의 Credential 정보의 흔적을 남기고 싶지 않을 경우
OAuth2 구성요소
- Resource Owner
- 사용할 Resource의 Owner -> 서비스를 이용하는 클라이언트
- Client
- 보호된 자원을 사용하려고 접근 요청을 하는 어플리케이션
- Resource Server
- 사용자의 보호된 자원을 호스팅하는 서버
- Authorization Server
- 클라이언트의 접근 자격을 확인 후, Access Token을 발급하여 권한을 부여하는 역할 수행
OAuth2 인증 처리 흐름
- User -> Resource 사용 요청
- Client -> Authorization Server로 권한 승인 요청
- Authorization Server -> Client로 권한 부여 승인코드 전달
- Client -> Authorization로 Access Token 요청
- Authorization Server -> Client로 토큰(접근권한) 부여
- Client -> Resource Server 보호된 자원 요청
- Resource Server -> Client 요청한 자원 전달

주요 API Parameter
|
client_id,
client_secret |
클라이언트 자격증명.
클라이언트가 권한 서버에 등록하면 발급받을 수 있으며 권한 서버 연동 시 클라이언트의 검증에 사용됩니다. |
|
redirect_url
|
권한 서버가 요청에 대한 응답을 보낼 url을 설정합니다.
|
|
response_type
|
권한 부여 동의 요청 시 포함되는 값으로 권한 부여 방식에 대한 설정입니다.
아래 값 중 한 개를 사용합니다.
· code: Authorization Code Grant
· token: Implicit Grant
|
|
state
|
CSRF 공격에 대비하기 위해 클라이언트가 권한서버에 요청 시 포함하는 임의의 문자열.
필수 사항은 아니지만, 클라이언트가 요청 시 state를 포함 시켰다면 권한 서버는 동일한 값을 클라이언트에게 보내야 합니다. |
|
grant_type
|
Access Token 획득 요청 시 포함되는 값으로 권한 부여 방식에 대한 설정입니다. 아래 값 중 한 개를 사용합니다.
· authorization_code: Authorization Code Grant
· password: Resource Owner Password Credentials Grant
· client_credentials: Client Credentials Grant
|
|
code
|
Authorization Code Grant 방식에서 Access Token요청 시 사용됩니다.
권한 서버에서 획득한 Authorization Code를 입력합니다. |
|
token_type
|
발행된 Token의 타입. 대표적으로 Bearer, MAC(Message Authentication Code)가 있습니다.
|
|
expires_in
|
토큰 만료 시간(단위: 초)
|
|
example_parameter
|
Token 타입에 따른 추가 파라미터 |
💡 권한 부여 방식
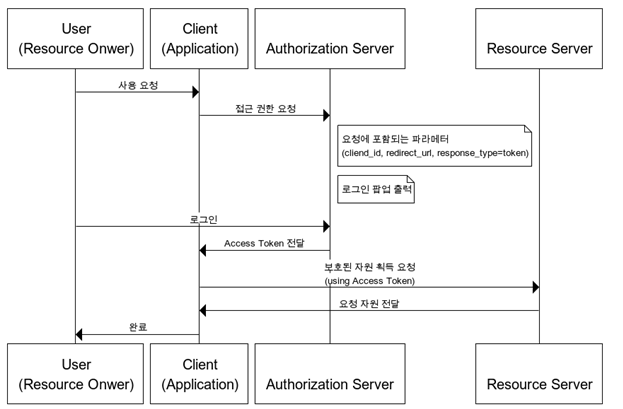
Authorization Code Grant │권한 부여 승인 코드 방식
- 요청 전송시 Client ID, Redirect URI, 응답 Type 포함하여 전송
- 로그인
- 로그인 성공 시 Redirect URI로 Authorization Code를 Client에게 전달
- 전달받은 Code를 이용해 AccessToken 발급 요청
- 리소스 요청 -> 응답
- Response_type = code

|
Step 1: Authorization
|
|
|
Request
|
(GET)/authorize?response_type=code&client_id=s6BhdRkqt3&state=xyz&redirect_uri=https%3A%2F%2Fclient%2Eexample%2Ecom%2Fc
|
|
Response
|
|
|
Step 2: Access Token
|
|
|
Request
|
(POST) /token
Authorization: Basic czZCaGRSa3F0MzpnWDFmQmF0M2JW
Content-Type: application/x-www-form-urlencoded
grant_type=authorization_code&code=SplxlOBeZQQYbYS6WxSbIA&redirect_uri=https%3A%2F%2Fclient%2Eexample%2Ecom%2Fcb
|
|
Response
|
{
"access_token":"2YotnFZFEjr1zCsicMWpAA",
"token_type":"example",
"expires_in":3600,
"refresh_token":"tGzv3JOkF0XG5Qx2TlKWIA",
"example_parameter":"example_value"
}
|
|
특이사항
|
Authorization Code 획득 후 해당 Code로 Access Token 획득
|
Implicit Grant │ 암묵적 승인 방식
- Authorization Code 없이 AccessToken을 발급하는 방식
- Credential을 Local에 저장하기 힘든 Client에게 적합한 방식
- Refresh Token 사용 불가
- Response_type = token
|
Request
|
(GET)/authorize?response_type=token&client_id=s6BhdRkqt3&state=xyz&redirect_uri=https%3A%2F%2Fclient%2Eexample%2Ecom%2Fcb
|
|
Response
|
|
|
특이사항
|
Authorize 요청 시 url로 Access Token이 바로 전달됨
|
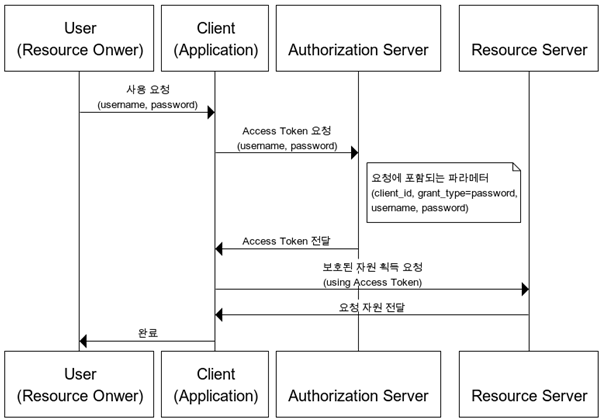
Resource Owner Password Credentials Grant │ 자원 소유자 자격증명 승인 방식
- ID / PW로 Access Token을 얻는 방식
- 모두 같은 시스템에 속해 있을때만 사용 가능
|
Request
|
(POST) /token
Authorization: Basic czZCaGRSa3F0MzpnWDFmQmF0M2JW
Content-Type: application/x-www-form-urlencoded
grant_type=password&username=johndoe&password=A3ddj3w
|
|
Response
|
{
"access_token":"2YotnFZFEjr1zCsicMWpAA",
"token_type":"example",
"expires_in":3600,
"refresh_token":"tGzv3JOkF0XG5Qx2TlKWIA",
"example_parameter":"example_value"
}
|
|
특이사항
|
Username, Password로 Access Token 획득
|
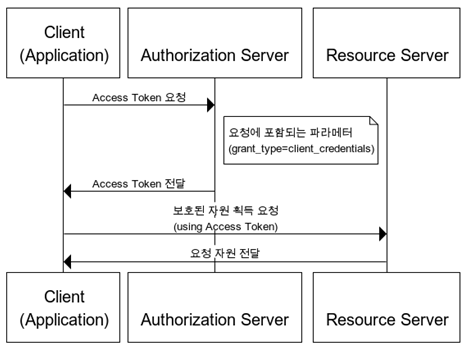
Client Credentials Grant │ 클라이언트 자격증명 승인 방식
- Refresh Token 사용 불가능
- Credential의 안전이 확보된 환경에서만 사용 권장
|
Request
|
(POST) /token
Authorization: Basic czZCaGRSa3F0MzpnWDFmQmF0M2JW
Content-Type: application/x-www-form-urlencoded
grant_type=client_credentials
|
|
Response
|
{
"access_token":"2YotnFZFEjr1zCsicMWpAA",
"token_type":"example",
"expires_in":3600,
"example_parameter":"example_value"
}
|
|
특이사항
|
클라이언트 자격증명만으로 Access Token 획득
|
💡 OAuth2 구조
> ## 📌 OAuth2 + JWT

> ### 구조

* ClientRegistration은 OAuth 2 시스템을 사용하는 Client 등록 정보를 표현하는 객체이다.

* Spring Security에서 제공하는 CommonOAuth2Provider enum은 내부적으로 Builder 패턴을 이용해 ClientRegistration 인스턴스를 제공하는 역할을 한다.

* OAuth2AuthorizedClientService는 권한을 부여받은 Client인 OAuth2AuthorizedClient를 관리하는 역할을 한다.

* OAuth2AuthorizedClientService를 이용해서 OAuth2AuthorizedClient 가 보유하고 있는 Access Token에 접근할 수 있다.

* OAuth2AuthorizedClientService의 loadAuthorizedClient("google", authentication.getName())를 호출하면 OAuth2AuthorizedClientRepository를 통해 OAuth2AuthorizedClient 객체를 로드 할 수 있다.

> ### 인증 처리 흐름 JWT + OAuth2, 6~11은 Spring이 내부적으로 처리해줌

(1) Resource Owner가 웹 브라우저에서 ‘Google 로그인 링크’를 클릭합니다.

(2) Frontend 어플리케이션에서 Backend 어플리케이션의 http://localhost:8080/oauth2/authorization/google로 request를 전송합니다. 이 URI의 requet는 OAuth2LoginAuthenticationFilter 가 처리합니다.

(3) Google의 로그인 화면을 요청하는 URI로 리다이렉트
이 때 Authorization Server가 Backend 어플리케이션 쪽으로 Authorization Code를 전송할
Redirect URI(http://localhost:8080/login/oauth2/code/google)를 쿼리 파라미터로 전달
Redirect URI는 Spring Security가 내부적으로 제공함

(4) Google 로그인 화면을 오픈

(5) Resource Owner가 Goole 로그인 인증 정보를 입력해서 로그인을 수행

(6) 로그인에 성공하면 (3)에서 전달한 Backend Redirect URI(http://localhost:8080/login/oauth2/code/google)로 Authorization Code를 요청

(7) Authorization Server가 Backend 어플리케이션에게 Authorization Code를 응답으로 전송

(8) Backend 어플리케이션이 Authorization Server에게 Access Token을 요청

(9) Authorization Server가 Backend 어플리케이션에게 Access Token을 응답으로 전송
여기서의 Access Token은 Google Resource Server에게 Resource를 요청하는 용도로 사용

(10) Backend 어플리케이션이 Resource Server에게 User Info를 요청합니다.
여기서의 User Info는 Resource Owner에 대한 이메일 주소, 프로필 정보 등을 의미

(11) Resource Server가 Backend 어플리케이션에게 User Info를 응답으로 전송

(12) Backend 어플리케이션은 JWT로 구성된 Access Token과 Refresh Token을 생성한 후,
Frondend 어플리케이션에게 JWT(Access Token과 Refresh Token)를 전달하기 위해
Frondend 어플리케이션(http://localhost?access_token={jwt-access-token}&refresh_token={jwt-refresh-token})으로 Redirect
💡 구현
CSR 방식의 Front + Back 어플리케이션에 JWT + OAuth2 적용
Google API 생성
https://console.cloud.google.com/apis
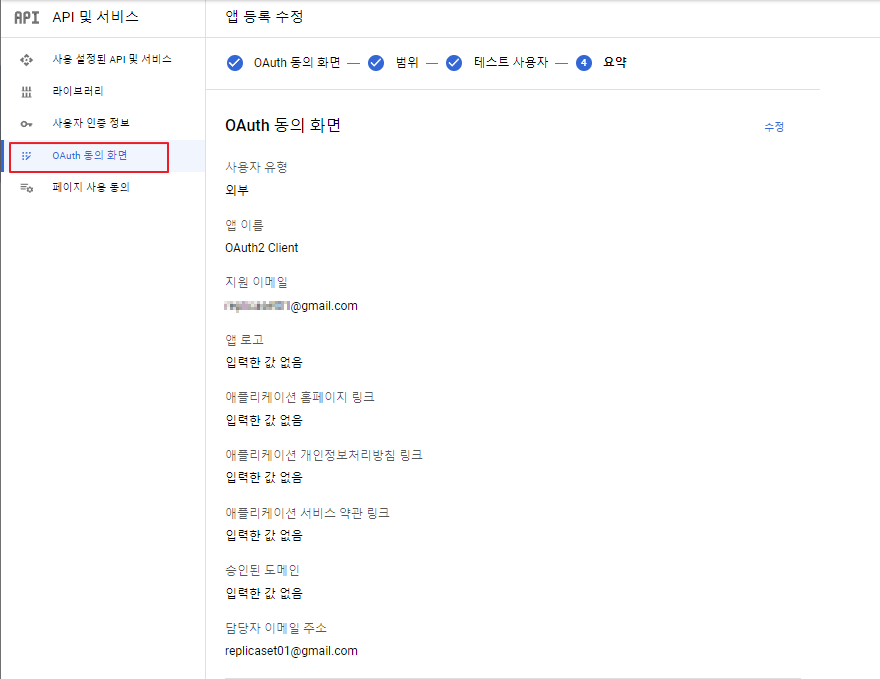
OAuth 동의 화면 생성
- User Type - 외부로 설정
- 개발자 연락처 정보 -
- 어플리케이션 이름
사용자 인증 정보 생성
- 사용자 인증 정보 생성 -> Oauth 클라이언트 ID 선택
- 어플리케이션 이름, 리다이렉션URI 설정
- 어플리케이션 유형 -> 웹 어플리케이션

💡 Front 어플리케이션 준비
https://www.apachelounge.com/download/ <- Apache 웹 서버 다운로드
경로 - C:\
Conf 파일 수정
- httpd.conf 파일
- ServerName localhost:80 <- 설정
서버 실행
- cmd
- cd c:\Apache24\bin
- httpd.exe -k install
- 설치 후 bin 폴더 내 ApacheMonitor.exe 실행 -> 서버 ON -> localhost:80 접속

샘플 어플리케이션을 아파치에 배포. Apache\htdocs 에 3개의 html파일 이동
- index.html
<!DOCTYPE html>
<html>
<head>
    <meta charset="UTF-8">
    <title>OAuth2 + JWT Frontend</title>
</head>
<body>
    <h2>Welcome to OAuth 2.0 + JWT Spring Security</h2>
    <a href="http://localhost:8080/oauth2/authorization/google">Google로 로그인</a>
</body>
</html>
- receive-token.html
<!DOCTYPE html>
<html>
<head>
    <meta charset="UTF-8">
    <title>OAuth2 + JWT My page</title>
</head>
<body>
    <script type="text/javascript">
        let accessToken = (new URL(location.href)).searchParams.get('access_token');
        let refreshToken = (new URL(location.href)).searchParams.get('refresh_token');

        localStorage.setItem("accessToken", accessToken)
        localStorage.setItem("refreshToken", refreshToken)

        location.href = 'my-page.html'
    </script>
</body>
</html>
- my-page.html
<!DOCTYPE html>
<html>
<head>
    <meta charset="UTF-8">
    <title>OAuth2 + JWT My page</title>
</head>
<body>
    <h2>My Page</h2>
    <h3>아래의 토큰을 이용해서 Backend 애플리케이션의 리소스를 요청할 수 있습니다.</h3>
    <p>
        <span>Access Token: </span><span id="accessToken" style="color: blue"></span>
    </p>
    <p>
        <span>Refresh Token: </span><span id="refreshToken" style="color: blue"></span>
    </p>
    <script type="text/javascript">
        let accessToken = localStorage.getItem('accessToken')
        let refreshToken = localStorage.getItem('refreshToken');

        document.getElementById("accessToken").textContent = accessToken;
        document.getElementById("refreshToken").textContent = refreshToken;
    </script>
</body>
</html>
💡 Backend 어플리케이션 준비
Add Dependency
implementation 'org.springframework.boot:spring-boot-starter-oauth2-client'
JwtTokenizer
@Component
public class JwtTokenizer {

    /* ----------------------------------------------------- */

    @Getter
    @Value("${jwt.key.secret}")
    private String secretKey;

    @Getter
    @Value("${jwt.access-token-expiration-minutes}")
    private int accessTokenExpirationMinutes;

    @Getter
    @Value("${jwt.refresh-token-expiration-minutes}")
    private int refreshTokenExpirationMinutes;

    /* ----------------------------------------------------- */

    // Encoding
    public String encodeBase64SecretKey(String secretKey) {
        return Encoders.BASE64.encode(secretKey.getBytes(StandardCharsets.UTF_8));
    }

    // Access Token 생성
    public String generateAccessToken(Map<String, Object> claims,
                                      String subject,
                                      Date expiration,
                                      String base64EncodedSecretKey) {
        Key key = getKeyFromBase64EncodedKey(base64EncodedSecretKey);

        return Jwts.builder()
                .setClaims(claims)
                .setSubject(subject)
                .setIssuedAt(Calendar.getInstance().getTime())
                .setExpiration(expiration)
                .signWith(key)
                .compact();
    }

    // Refresh Token 생성
    public String generateRefreshToken(String subject, Date expiration, String base64EncodedSecretKey) {
        Key key = getKeyFromBase64EncodedKey(base64EncodedSecretKey);

        return Jwts.builder()
                .setSubject(subject)
                .setIssuedAt(Calendar.getInstance().getTime())
                .setExpiration(expiration)
                .signWith(key)
                .compact();
    }

    // 검증 후, Claims을 반환 용도
    public Jws<Claims> getClaims(String jws, String base64EncodedSecretKey) {
        Key key = getKeyFromBase64EncodedKey(base64EncodedSecretKey);

        Jws<Claims> claims = Jwts.parserBuilder()
                .setSigningKey(key)
                .build()
                .parseClaimsJws(jws);
        return claims;
    }

    // 단순 검증 용도
    public void verifySignature(String jws, String base64EncodedSecretKey) {
        Key key = getKeyFromBase64EncodedKey(base64EncodedSecretKey);

        Jwts.parserBuilder()
                .setSigningKey(key)
                .build()
                .parseClaimsJws(jws);
    }

    // 토큰 만료일 얻는 용도
    public Date getTokenExpiration(int expirationMinutes) {
        Calendar calendar = Calendar.getInstance();
        calendar.add(Calendar.MINUTE, expirationMinutes);
        Date expiration = calendar.getTime();

        return expiration;
    }

    // 디코딩
    private Key getKeyFromBase64EncodedKey(String base64EncodedSecretKey) {
        byte[] keyBytes = Decoders.BASE64.decode(base64EncodedSecretKey);
        Key key = Keys.hmacShaKeyFor(keyBytes);

        return key;
    }
}
Jwt 검증 필터
// Request당 1번만 실행되는 Security Filter 상속
public class JwtVerificationFilter extends OncePerRequestFilter {

    private final JwtTokenizer jwtTokenizer;
    private final CustomAuthorityUtils authorityUtils;

    // JwtTokenizer =  JWT 검증 + Claims를 얻는데 사용
    // CustomAuthorityUtils = JWT 검증에 성공하면 Authentication 객체에 채울 유저의 권한 생성하는데 사용
    public JwtVerificationFilter(JwtTokenizer jwtTokenizer, CustomAuthorityUtils authorityUtils) {
        this.jwtTokenizer = jwtTokenizer;
        this.authorityUtils = authorityUtils;
    }

    @Override
    protected void doFilterInternal(HttpServletRequest request, HttpServletResponse response, FilterChain filterChain) throws ServletException, IOException {

        // JWT 검증 Private Method
        Map<String, Object> claims = verifyJws(request);

        setAuthenticationToContext(claims);

        filterChain.doFilter(request, response);
    }

    @Override
    protected boolean shouldNotFilter(HttpServletRequest request) throws ServletException {

        String authorization = request.getHeader("Authorization");

        return authorization == null | !authorization.startsWith("Bearer");
    }

    /** [JWT 검증 Private Method]
     *  jws = request의 Header에서 JWT를 얻고 replace()를 이용해 Bearer 부분 삭제
     *  base64EncodedSecretKey = JWT 서명을 검증하기 위한 Secret Key
     *  claims = JWT에서 Claims 파싱.
     *  * 파싱에 성공 == 내부적으로 서명 검증에 성공했다는 말과 동일함
     */
    private Map<String, Object> verifyJws(HttpServletRequest request) {
        String jws = request.getHeader("Authorization").replace("Bearer ", ""); // (3-1)
        String base64EncodedSecretKey = jwtTokenizer.encodeBase64SecretKey(jwtTokenizer.getSecretKey()); // (3-2)
        Map<String, Object> claims = jwtTokenizer.getClaims(jws, base64EncodedSecretKey).getBody();   // (3-3)

        return claims;
    }

    /** [Authentication 객체를 SecurityContext에 저장하기 위한 Private Method]
     * username = 파싱한 claims에서 username을 얻음
     * authorities = claims에서 얻은 권한정보를 기반으로 List<GrantedAuthority> 생성
     * authentication = username과 GrantedAuthority를 포함해 Authentication 객체 생성
     * SecurityContext에 Authentication 저장
     */
    private void setAuthenticationToContext(Map<String, Object> claims) {
        String username = (String) claims.get("username");   // (4-1)
        List<GrantedAuthority> authorities = authorityUtils.createAuthorities((List)claims.get("roles"));  // (4-2)
        Authentication authentication = new UsernamePasswordAuthenticationToken(username, null, authorities);  // (4-3)
        SecurityContextHolder.getContext().setAuthentication(authentication); // (4-4)
    }
}
AuthenticationSuccessHandler
/** 이 클래스는 OAuth2 인증 후, Front쪽으로 JWT를 전송하는 핵심 클래스
 *  SimpleUrlAuthenticationSuccessHandler의 getRedirectStrategy().sendRedirect()를 이용해 손쉬운 리다이렉트
 */

public class OAuth2ClientSuccessHandler extends SimpleUrlAuthenticationSuccessHandler {
    private final JwtTokenizer jwtTokenizer;
    private final CustomAuthorityUtils authorityUtils;
    private final MemberService memberService;

    public OAuth2ClientSuccessHandler(JwtTokenizer jwtTokenizer, CustomAuthorityUtils authorityUtils, MemberService memberService) {
        this.jwtTokenizer = jwtTokenizer;
        this.authorityUtils = authorityUtils;
        this.memberService = memberService;
    }

    @Override
    public void onAuthenticationSuccess(HttpServletRequest request, HttpServletResponse response, Authentication authentication) throws IOException, ServletException {

        // 타입 추론
        var oAuth2User = (OAuth2User) authentication.getPrincipal();

        // Authentication 객체에서 얻은 OAuth2 User 객체에서 Resoutce Owner의 이메일 주소를 얻음
        String email = String.valueOf(oAuth2User.getAttributes().get("email"));

        // DI 받은 CustomAuthorityUtils를 이용해 권한 정보 생성
        List<String> authorities = authorityUtils.createRoles(email);

        // Resource Owner의 이메일을 DB에 저장
        saveMember(email);

        // Access Token, Refresh Token을 생성해 Front로 전달하기 위해 Redirect 처리
        redirect(request, response, email, authorities);
    }

    private void saveMember(String email) {
        Member member = new Member(email);
        member.setStamp(new Stamp());
        memberService.createMember(member);
    }

    private void redirect(HttpServletRequest request, HttpServletResponse response, String username, List<String> authorities) throws IOException {

        // Access Token 생성
        String accessToken = delegateAccessToken(username, authorities);

        // Refresh Token 생성
        String refreshToken = delegateRefreshToken(username);

        // UriComponentBuilder 를 이용해 Front 쪽의 URL 생성
        String uri = createURI(accessToken, refreshToken).toString();

        // Front로 리다이렉트
        getRedirectStrategy().sendRedirect(request, response, uri);
    }

    // Access Token 생성
    private String delegateAccessToken(String username, List<String> authorities) {
        Map<String, Object> claims = new HashMap<>();
        claims.put("username", username);
        claims.put("roles", authorities);

        String subject = username;
        Date expiration = jwtTokenizer.getTokenExpiration(jwtTokenizer.getAccessTokenExpirationMinutes());

        String base64EncodedSecretKey = jwtTokenizer.encodeBase64SecretKey(jwtTokenizer.getSecretKey());

        String accessToken = jwtTokenizer.generateAccessToken(claims, subject, expiration, base64EncodedSecretKey);

        return accessToken;
    }

    // Refresh Token 생성
    private String delegateRefreshToken(String username) {
        String subject = username;
        Date expiration = jwtTokenizer.getTokenExpiration(jwtTokenizer.getRefreshTokenExpirationMinutes());
        String base64EncodedSecretKey = jwtTokenizer.encodeBase64SecretKey(jwtTokenizer.getSecretKey());

        String refreshToken = jwtTokenizer.generateRefreshToken(subject, expiration, base64EncodedSecretKey);

        return refreshToken;
    }

    // URL 생성
    private URI createURI(String accessToken, String refreshToken) {
        MultiValueMap<String, String> queryParams = new LinkedMultiValueMap<>();
        queryParams.add("access_token", accessToken);
        queryParams.add("refresh_token", refreshToken);

        return UriComponentsBuilder
                .newInstance()
                .scheme("http")
                .host("localhost")
                .port(80) // Front 서버인 Apache의 포트
                .path("/receive-token.html")
                .queryParams(queryParams)
                .build()
                .toUri();
    }
}
SecurityConfiguration
import com.qna.security.userdetails.CustomAuthorityUtils;
import com.qna.service.MemberService;
import org.springframework.context.annotation.Bean;
import org.springframework.context.annotation.Configuration;
import org.springframework.http.HttpMethod;
import org.springframework.security.config.annotation.web.builders.HttpSecurity;
import org.springframework.security.config.annotation.web.configurers.AbstractHttpConfigurer;
import org.springframework.security.config.http.SessionCreationPolicy;
import org.springframework.security.oauth2.client.web.OAuth2LoginAuthenticationFilter;
import org.springframework.security.web.SecurityFilterChain;
import org.springframework.web.cors.CorsConfiguration;
import org.springframework.web.cors.CorsConfigurationSource;
import org.springframework.web.cors.UrlBasedCorsConfigurationSource;

import java.util.Arrays;

import static org.springframework.security.config.Customizer.withDefaults;

@Configuration
public class SecurityConfiguration {
    private final JwtTokenizer jwtTokenizer;
    private final CustomAuthorityUtils authorityUtils;
    private final MemberService memberService;

    public SecurityConfiguration(JwtTokenizer jwtTokenizer,
                                 CustomAuthorityUtils authorityUtils,
                                 MemberService memberService) {
        this.jwtTokenizer = jwtTokenizer;
        this.authorityUtils = authorityUtils;
        this.memberService = memberService;
    }

    @Bean
    public SecurityFilterChain filterChain(HttpSecurity http) throws Exception {
        http
                .headers().frameOptions().sameOrigin()
                .and()
                .csrf().disable()
                .cors(withDefaults())
                .sessionManagement().sessionCreationPolicy(SessionCreationPolicy.STATELESS)
                .and()
                .formLogin().disable()
                .httpBasic().disable()
                .exceptionHandling()  // 추가
                .authenticationEntryPoint(new AuthenticationEntryPoint())  // 추가
                .accessDeniedHandler(new AccessDeniedHandler())            // 추가
                .and()
                .apply(new CustomFilterConfigurer())  // 추가
                .and()
                .authorizeHttpRequests(authorize -> authorize // url authorization 전체 추가
//                        .antMatchers(HttpMethod.POST, "/*/members").permitAll()    // OAuth 2로 로그인하므로 회원 정보 등록 필요 없음.
//                        .antMatchers(HttpMethod.PATCH, "/*/members/**").hasRole("USER") // OAuth 2로 로그인하므로 회원 정보 수정 필요 없음.
//                        .antMatchers(HttpMethod.GET, "/*/members").hasRole("ADMIN")  // OAuth 2로 로그인하므로 회원 정보 수정 필요 없음.
//                        .antMatchers(HttpMethod.GET, "/*/members/**").hasAnyRole("USER", "ADMIN")  // OAuth 2로 로그인하므로 회원 정보 수정 필요 없음.
//                        .antMatchers(HttpMethod.DELETE, "/*/members/**").hasRole("USER") // OAuth 2로 로그인하므로 회원 정보 수정 필요 없음.
                                .antMatchers(HttpMethod.POST, "/*/coffees").hasRole("ADMIN")
                                .antMatchers(HttpMethod.PATCH, "/*/coffees/**").hasRole("ADMIN")
                                .antMatchers(HttpMethod.GET, "/*/coffees/**").hasAnyRole("USER", "ADMIN")
                                .antMatchers(HttpMethod.GET, "/*/coffees").permitAll()
                                .antMatchers(HttpMethod.DELETE, "/*/coffees").hasRole("ADMIN")
                                .antMatchers(HttpMethod.POST, "/*/orders").hasRole("USER")
                                .antMatchers(HttpMethod.PATCH, "/*/orders").hasAnyRole("USER", "ADMIN")
                                .antMatchers(HttpMethod.GET, "/*/orders/**").hasAnyRole("USER", "ADMIN")
                                .antMatchers(HttpMethod.DELETE, "/*/orders").hasRole("USER")
                                .antMatchers(HttpMethod.POST, "/*/questions").hasRole("ADMIN")
                                .antMatchers(HttpMethod.PATCH, "/*/questions/**").hasRole("ADMIN")
                                .antMatchers(HttpMethod.GET, "/*/questions/**").hasAnyRole("USER", "ADMIN")
                                .antMatchers(HttpMethod.GET, "/*/questions").permitAll()
                                .antMatchers(HttpMethod.POST, "/*/answers").hasRole("ADMIN")
                                .antMatchers(HttpMethod.PATCH, "/*/answers/**").hasRole("ADMIN")
                                .antMatchers(HttpMethod.GET, "/*/answers/**").hasAnyRole("USER", "ADMIN")
                                .antMatchers(HttpMethod.GET, "/*/answers").permitAll()
                                .anyRequest().permitAll()
                )
                .oauth2Login(oauth2 -> oauth2
                        .successHandler(new OAuth2ClientSuccessHandler(jwtTokenizer, authorityUtils, memberService))  // (1)
                );

        return http.build();
    }

    // CORS 설정
    @Bean
    CorsConfigurationSource corsConfigurationSource() {
        CorsConfiguration configuration = new CorsConfiguration();
        configuration.setAllowedOrigins(Arrays.asList("*"));
        configuration.setAllowedMethods(Arrays.asList("GET","POST", "PATCH", "DELETE"));
        UrlBasedCorsConfigurationSource source = new UrlBasedCorsConfigurationSource();
        source.registerCorsConfiguration("/**", configuration);
        return source;
    }

    // 추가
    public class CustomFilterConfigurer extends AbstractHttpConfigurer<CustomFilterConfigurer, HttpSecurity> {
        @Override
        public void configure(HttpSecurity builder) throws Exception {
            JwtVerificationFilter jwtVerificationFilter = new JwtVerificationFilter(jwtTokenizer, authorityUtils);

            // Jwt 검증 필터를 OAuth2 필터 뒤에 추가
            builder.addFilterAfter(jwtVerificationFilter, OAuth2LoginAuthenticationFilter.class);
        }
    }
}
CustomAuthorityUtils
import org.springframework.beans.factory.annotation.Value;
import org.springframework.security.core.GrantedAuthority;
import org.springframework.security.core.authority.AuthorityUtils;
import org.springframework.security.core.authority.SimpleGrantedAuthority;
import org.springframework.stereotype.Component;

import java.util.List;
import java.util.stream.Collectors;

@Component
public class CustomAuthorityUtils {

    @Value("${mail.address.admin}")
    private String adminMailAddress;

    // 메모리 저장용
    private final List<GrantedAuthority> ADMIN_ROLES = AuthorityUtils.createAuthorityList("ROLE_ADMIN", "ROLE_USER");
    private final List<GrantedAuthority> USER_ROLES = AuthorityUtils.createAuthorityList("ROLE_USER");

    // DB 저장용
    private final List<String> ADMIN_ROLES_STRING = List.of("ADMIN", "USER");
    private final List<String> USER_ROLES_STRING = List.of("USER");


    // 메모리 상의 Role 기반으로 권한 생성
    public List<GrantedAuthority> createAuthorities(String email) {

        if (email.equals(adminMailAddress)) {
            return ADMIN_ROLES;
        }
        return USER_ROLES;
    }

    // DB에 저장된 Role을 기반으로 권한 정보 생성
    public List<GrantedAuthority> createAuthorities(List<String> roles) {

        List<GrantedAuthority> authorities = roles.stream()
                .map(role -> new SimpleGrantedAuthority("ROLE_"+role))
                .collect(Collectors.toList());
        return authorities;
    }

    // DB 저장용
    public List<String> createRoles(String email) {

        if (email.equals(adminMailAddress)) {
            return ADMIN_ROLES_STRING;
        }
        return USER_ROLES_STRING;
    }
}
AccessDeniedHandler
@Component
@Slf4j
public class AccessDeniedHandler implements org.springframework.security.web.access.AccessDeniedHandler {

    @Override
    public void handle(HttpServletRequest request, HttpServletResponse response, AccessDeniedException accessDeniedException) throws IOException, ServletException {
        ErrorResponder.sendErrorResponse(response, HttpStatus.FORBIDDEN);
        log.warn("Forbidden error happened: {}", accessDeniedException.getMessage());
    }
}'Framework > Spring' 카테고리의 다른 글
| Project Reactor (0) | 2022.11.29 |
|---|---|
| Reactive System & Reactive Programming (0) | 2022.11.29 |
| Implement JWT Login Authentication (0) | 2022.11.25 |
| JWT (Json Web Token) & Sticky Session (0) | 2022.11.22 |
| Spring EL 접근 제어 표현식 (0) | 2022.11.21 |